
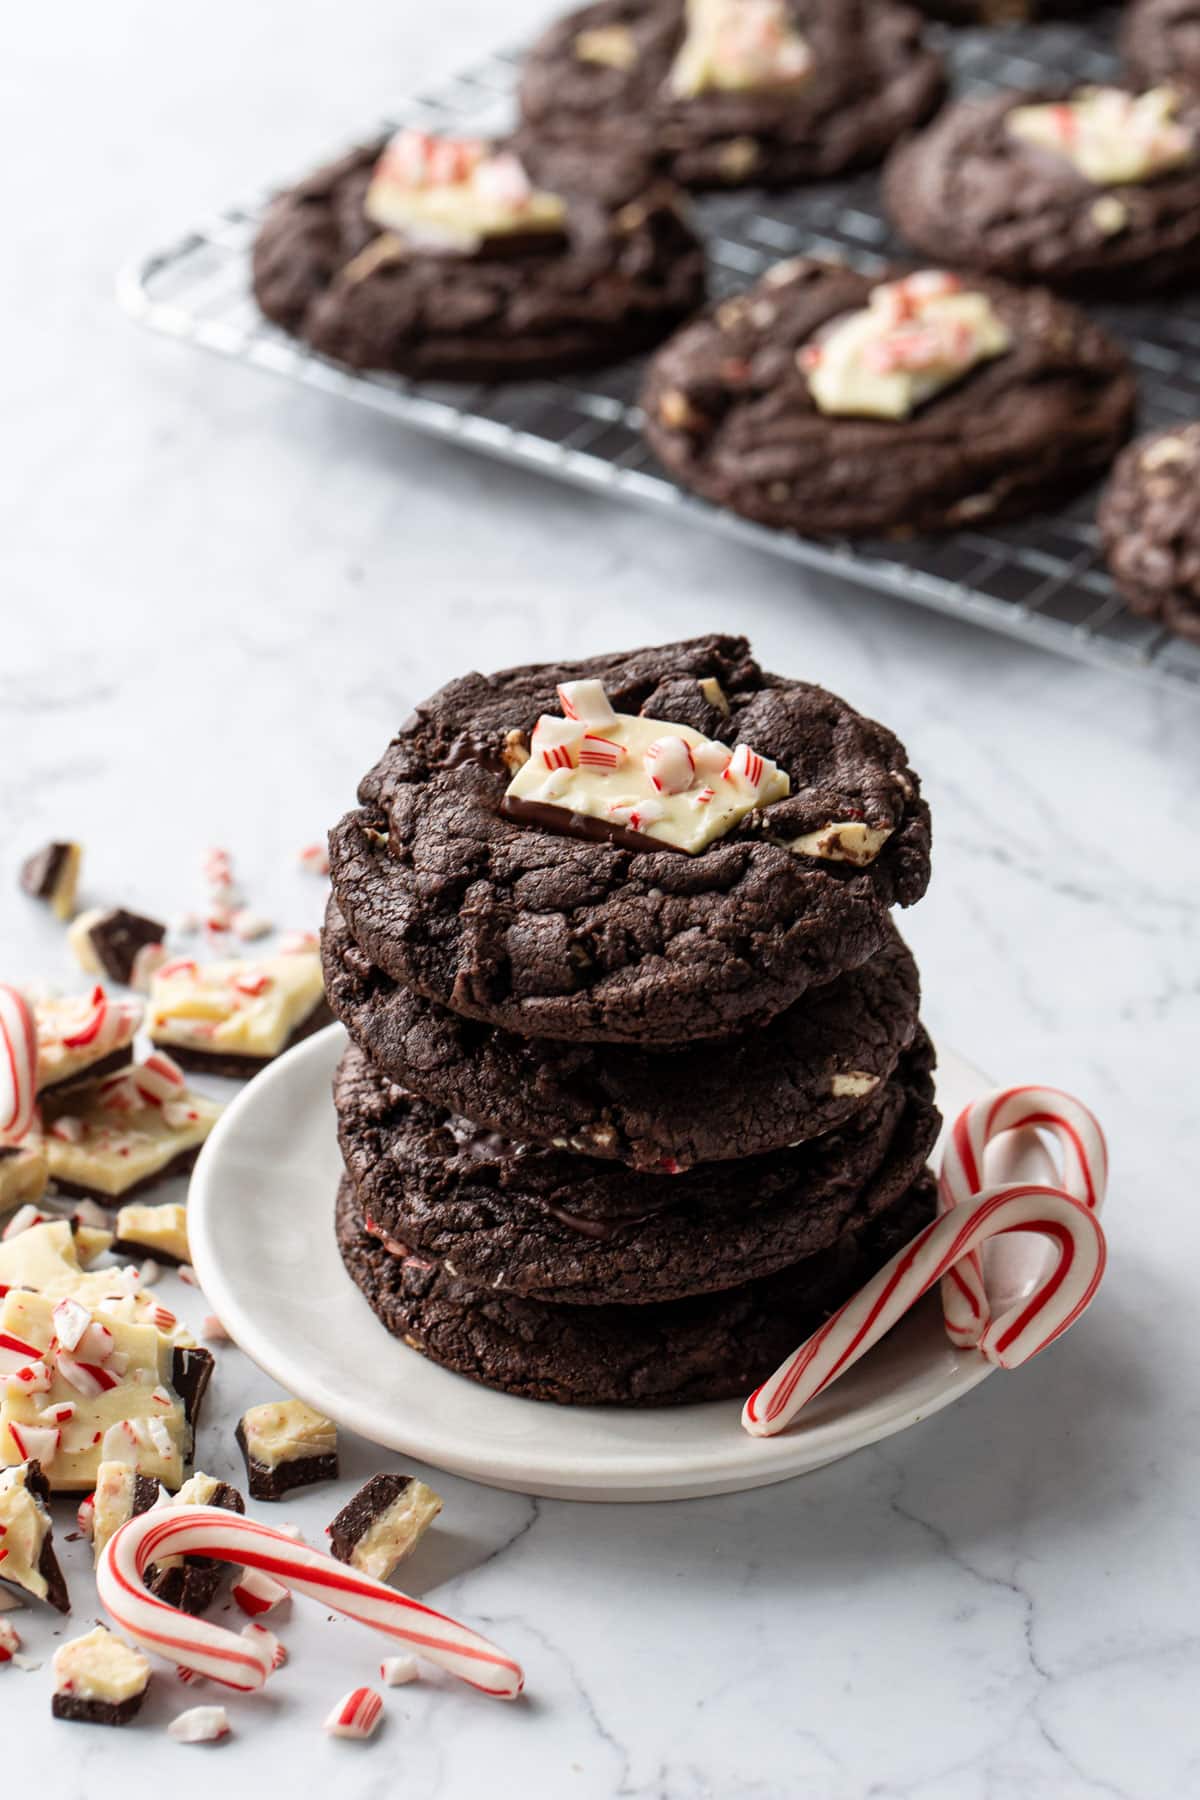
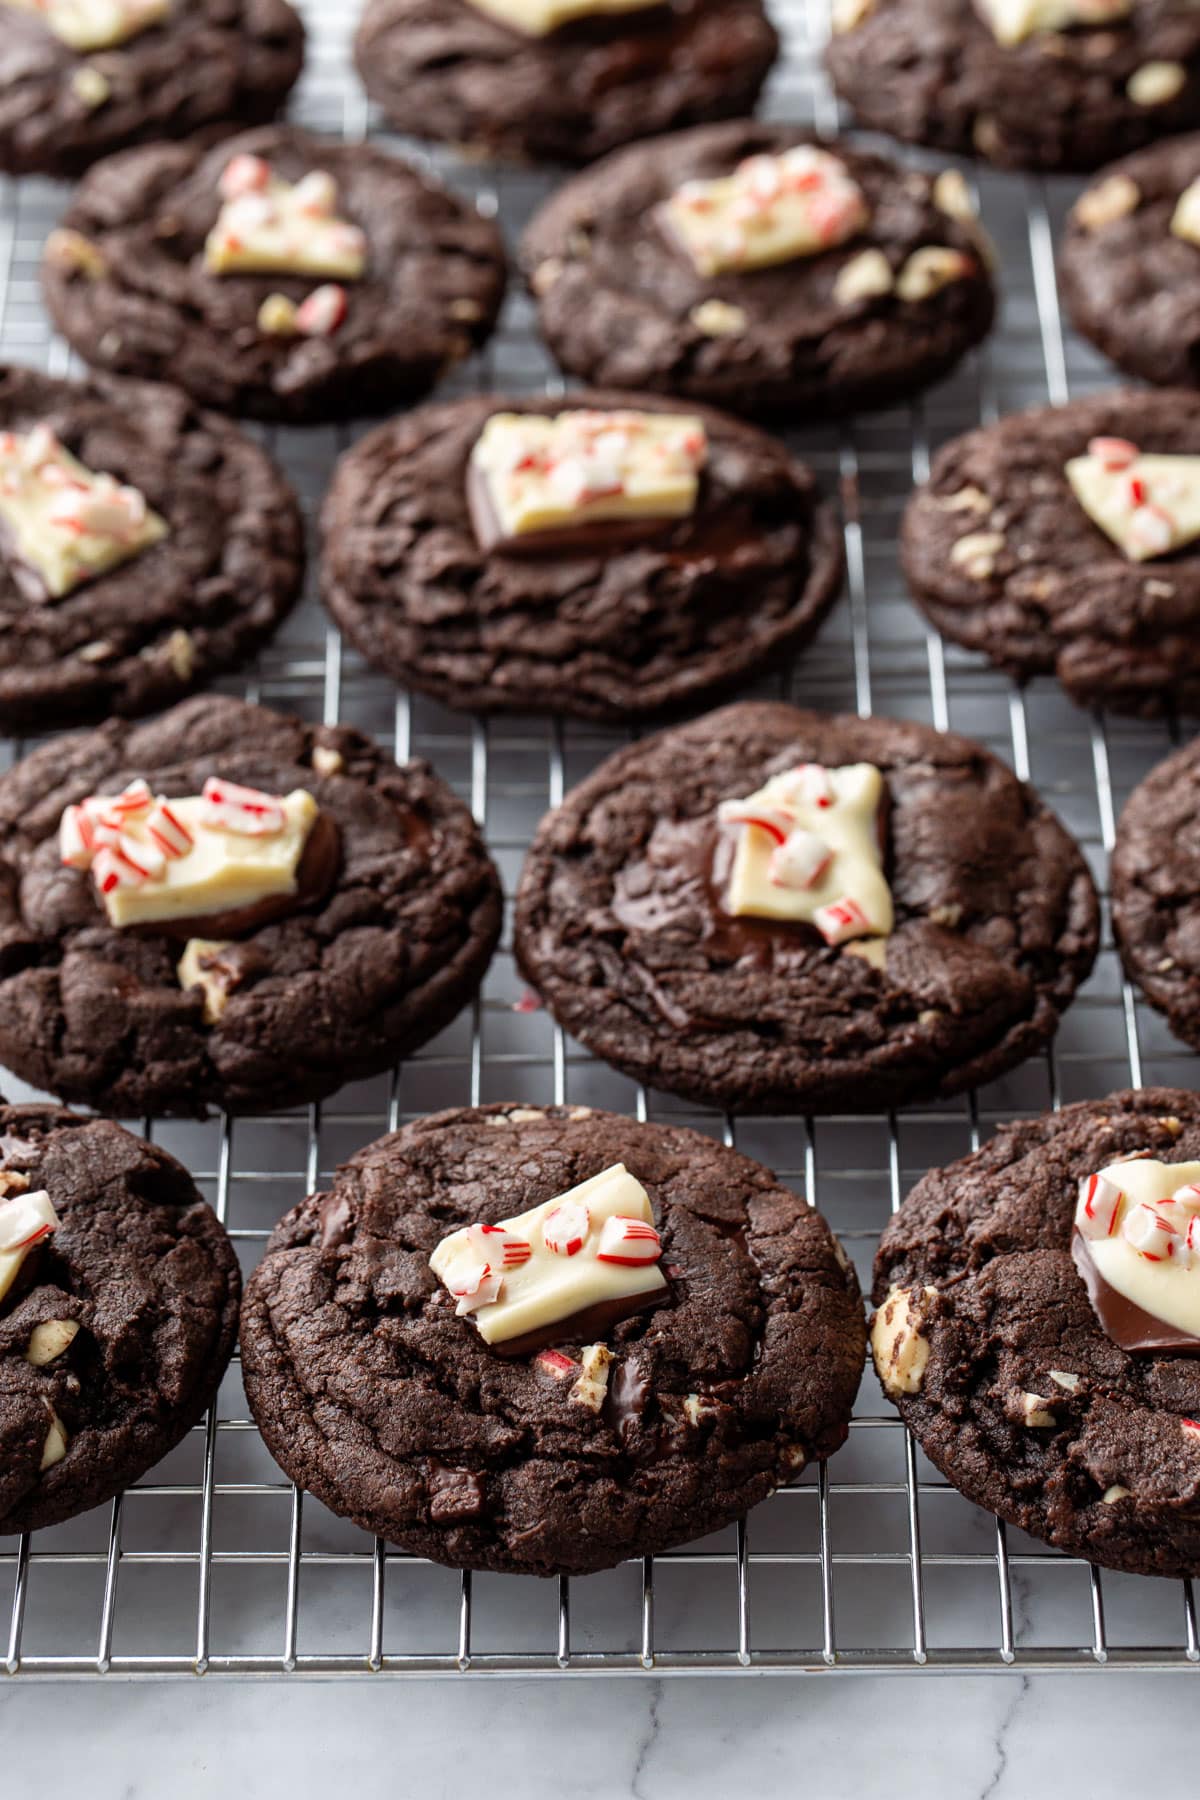
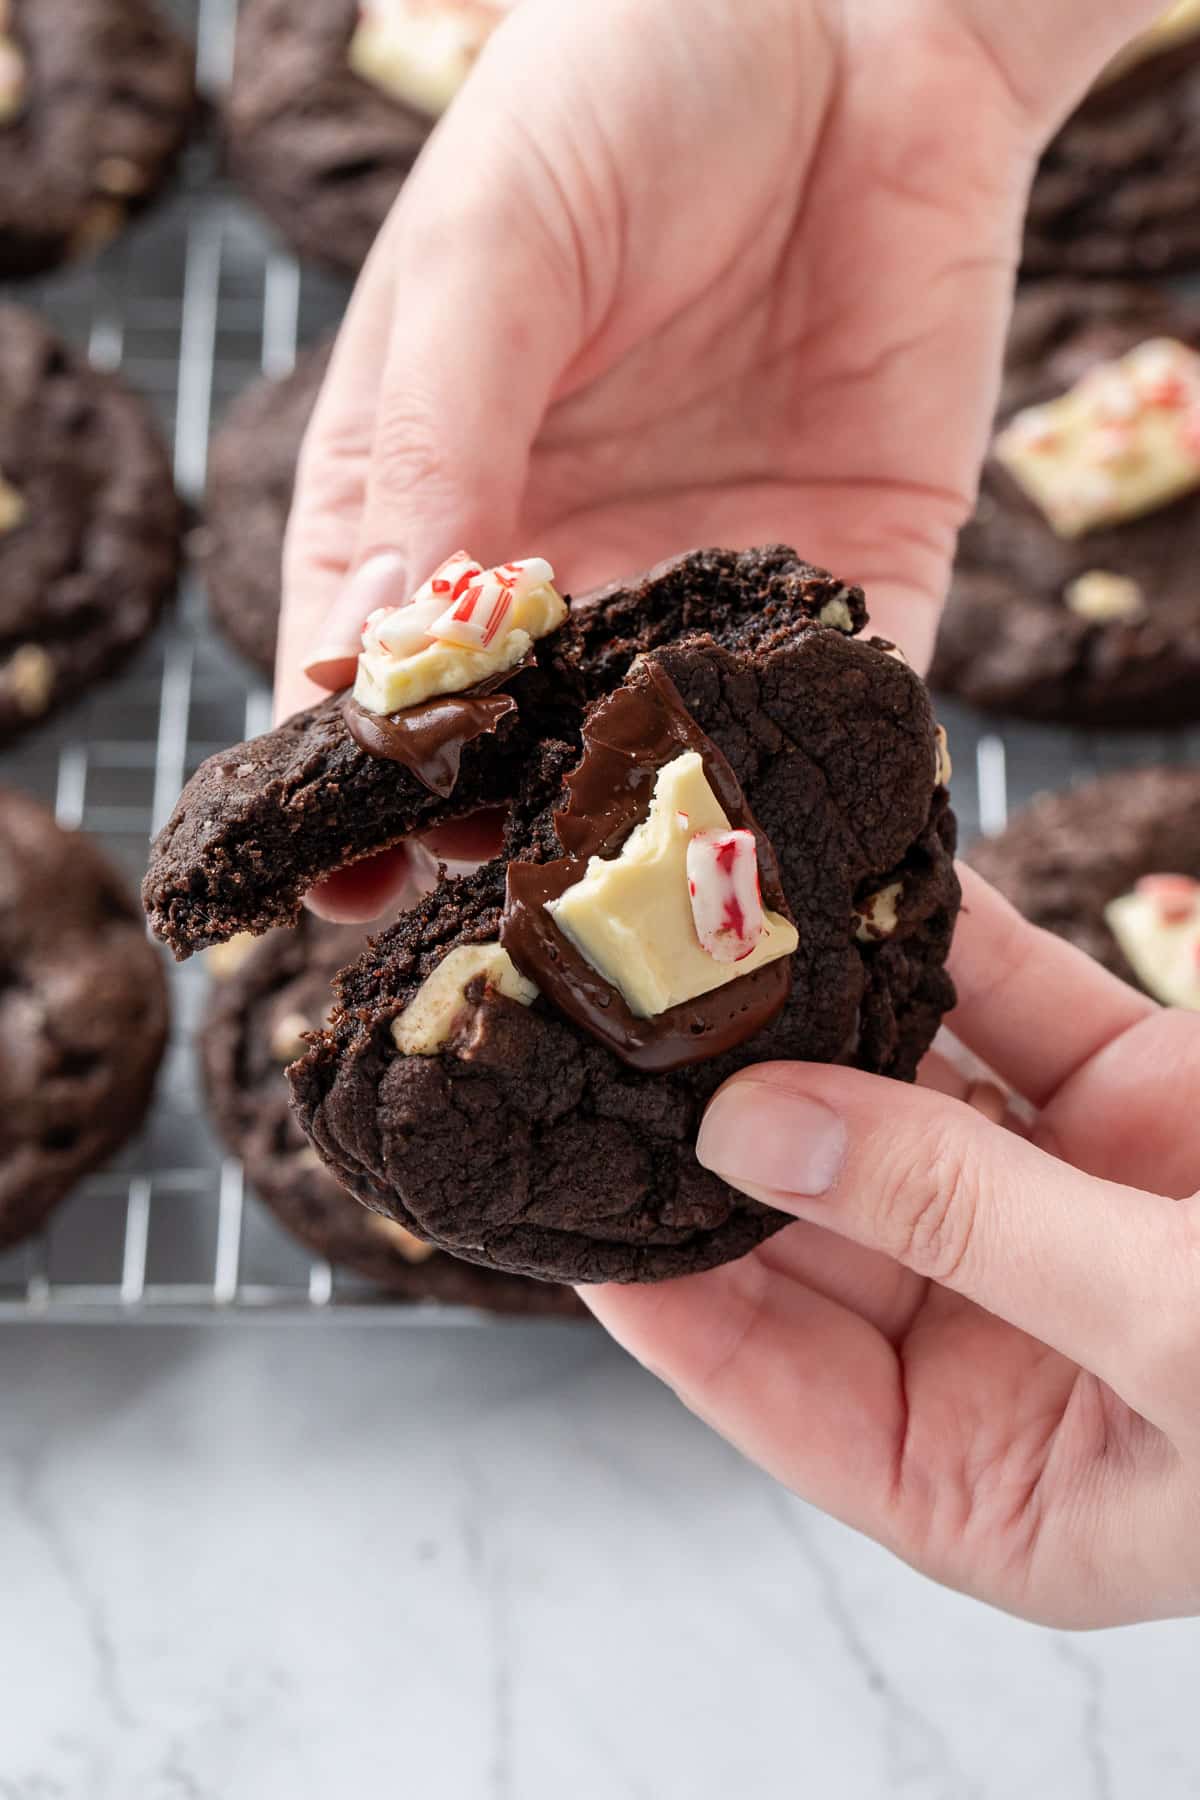
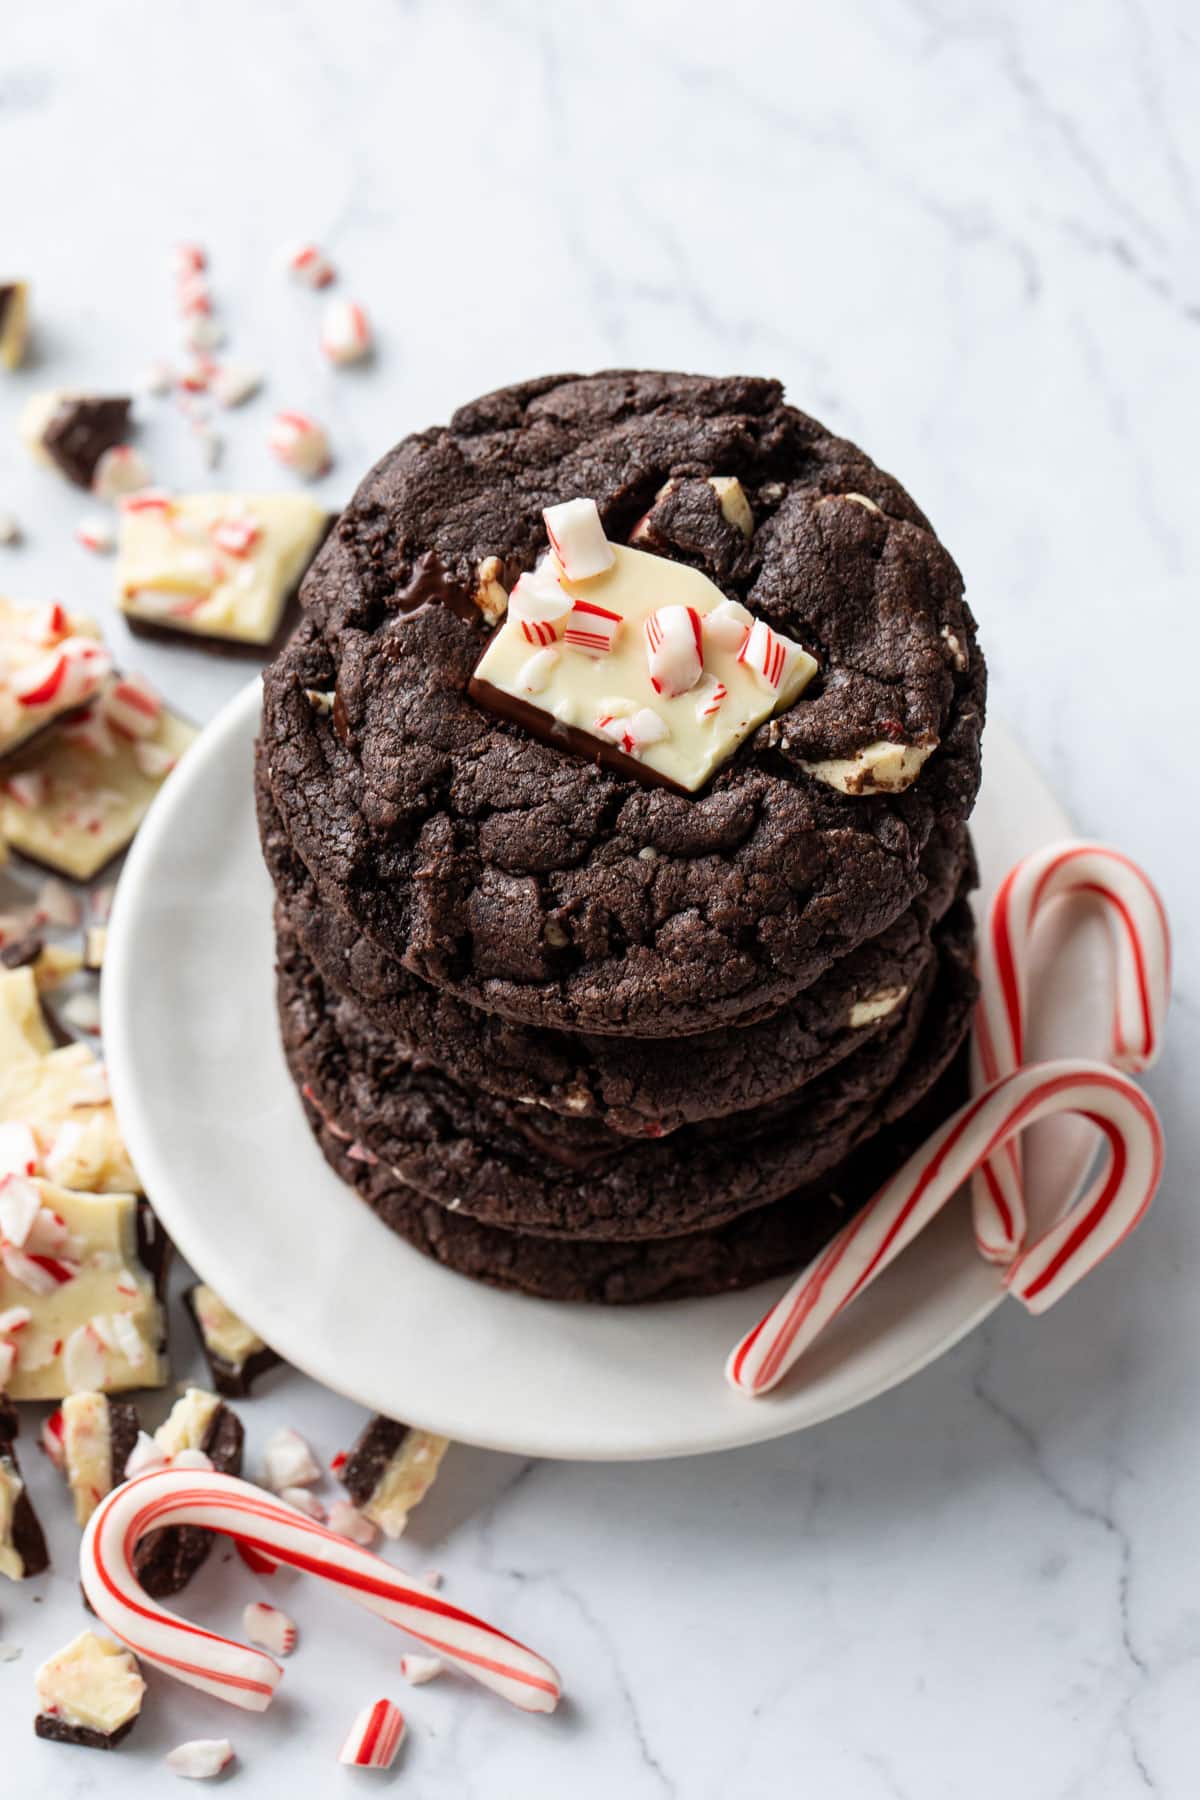
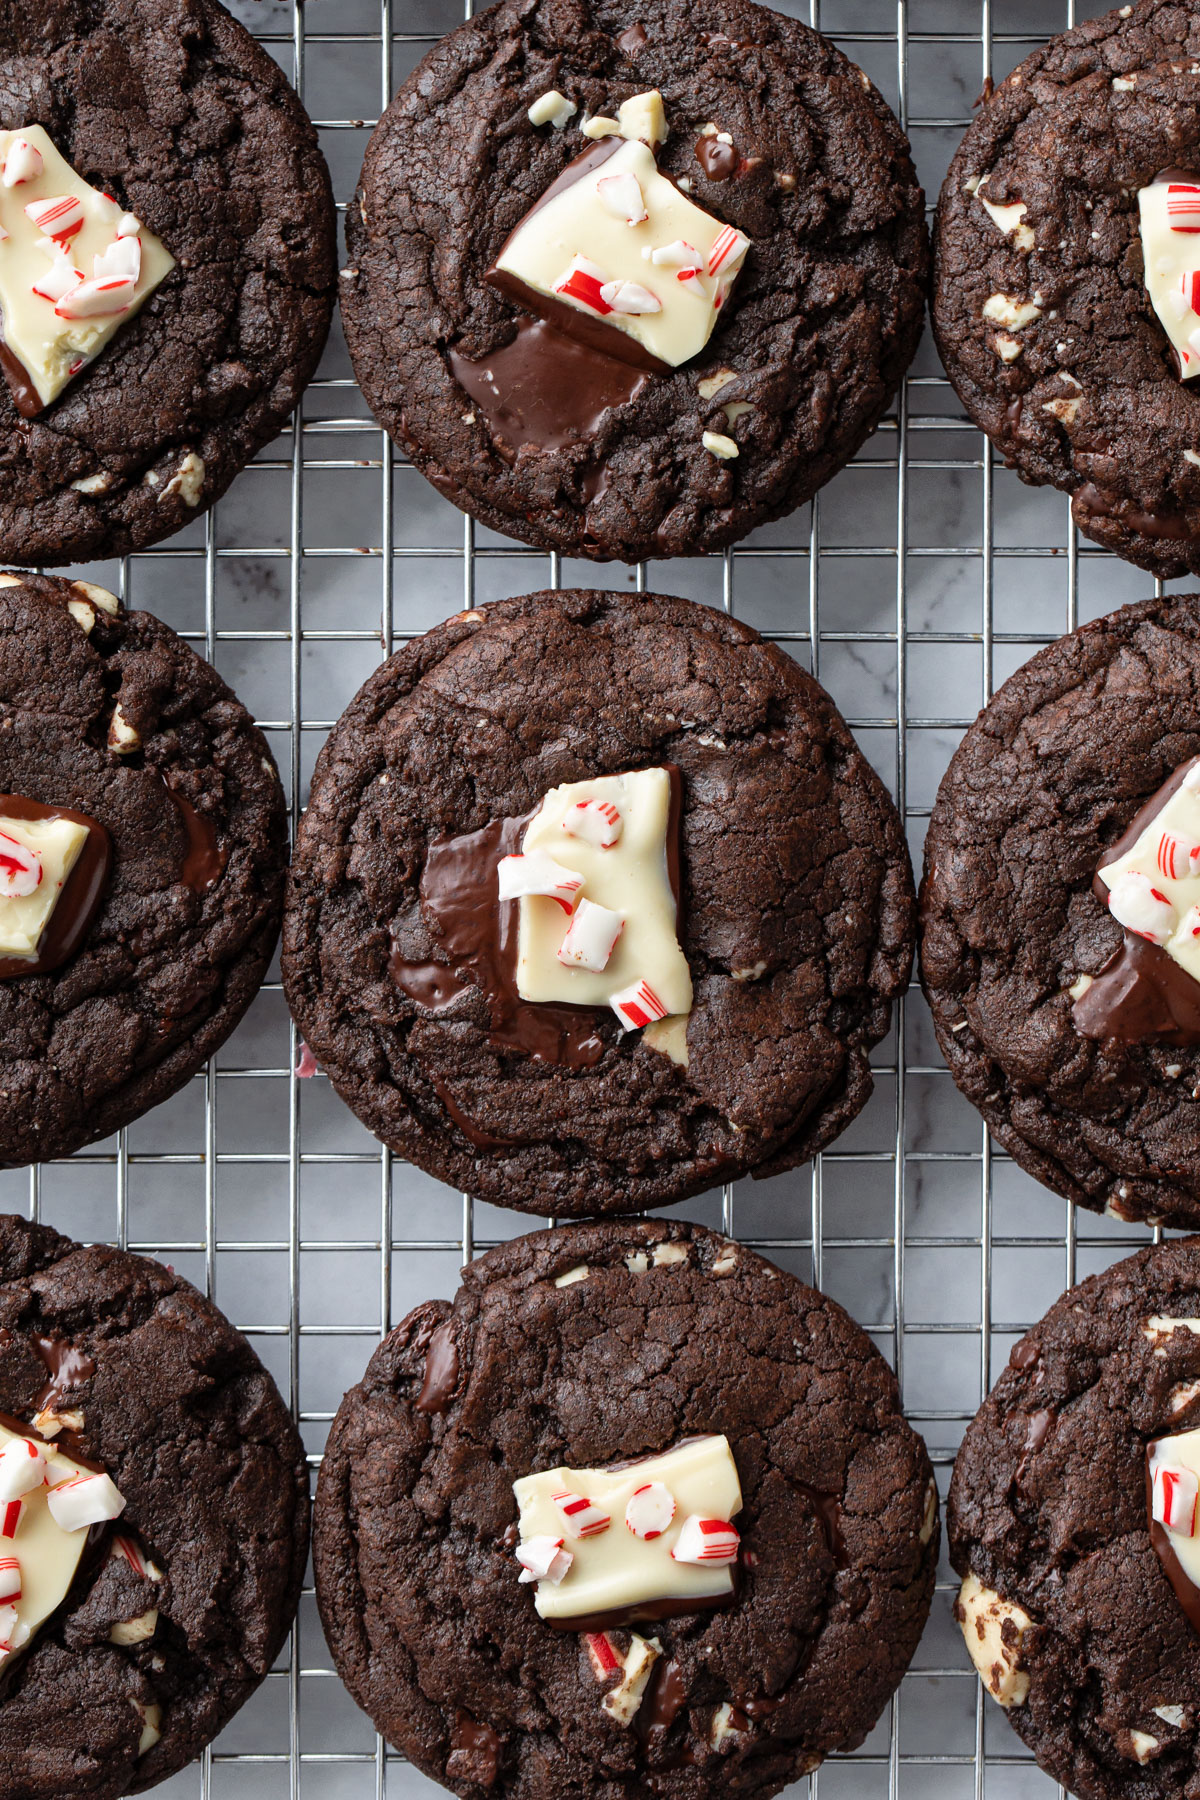
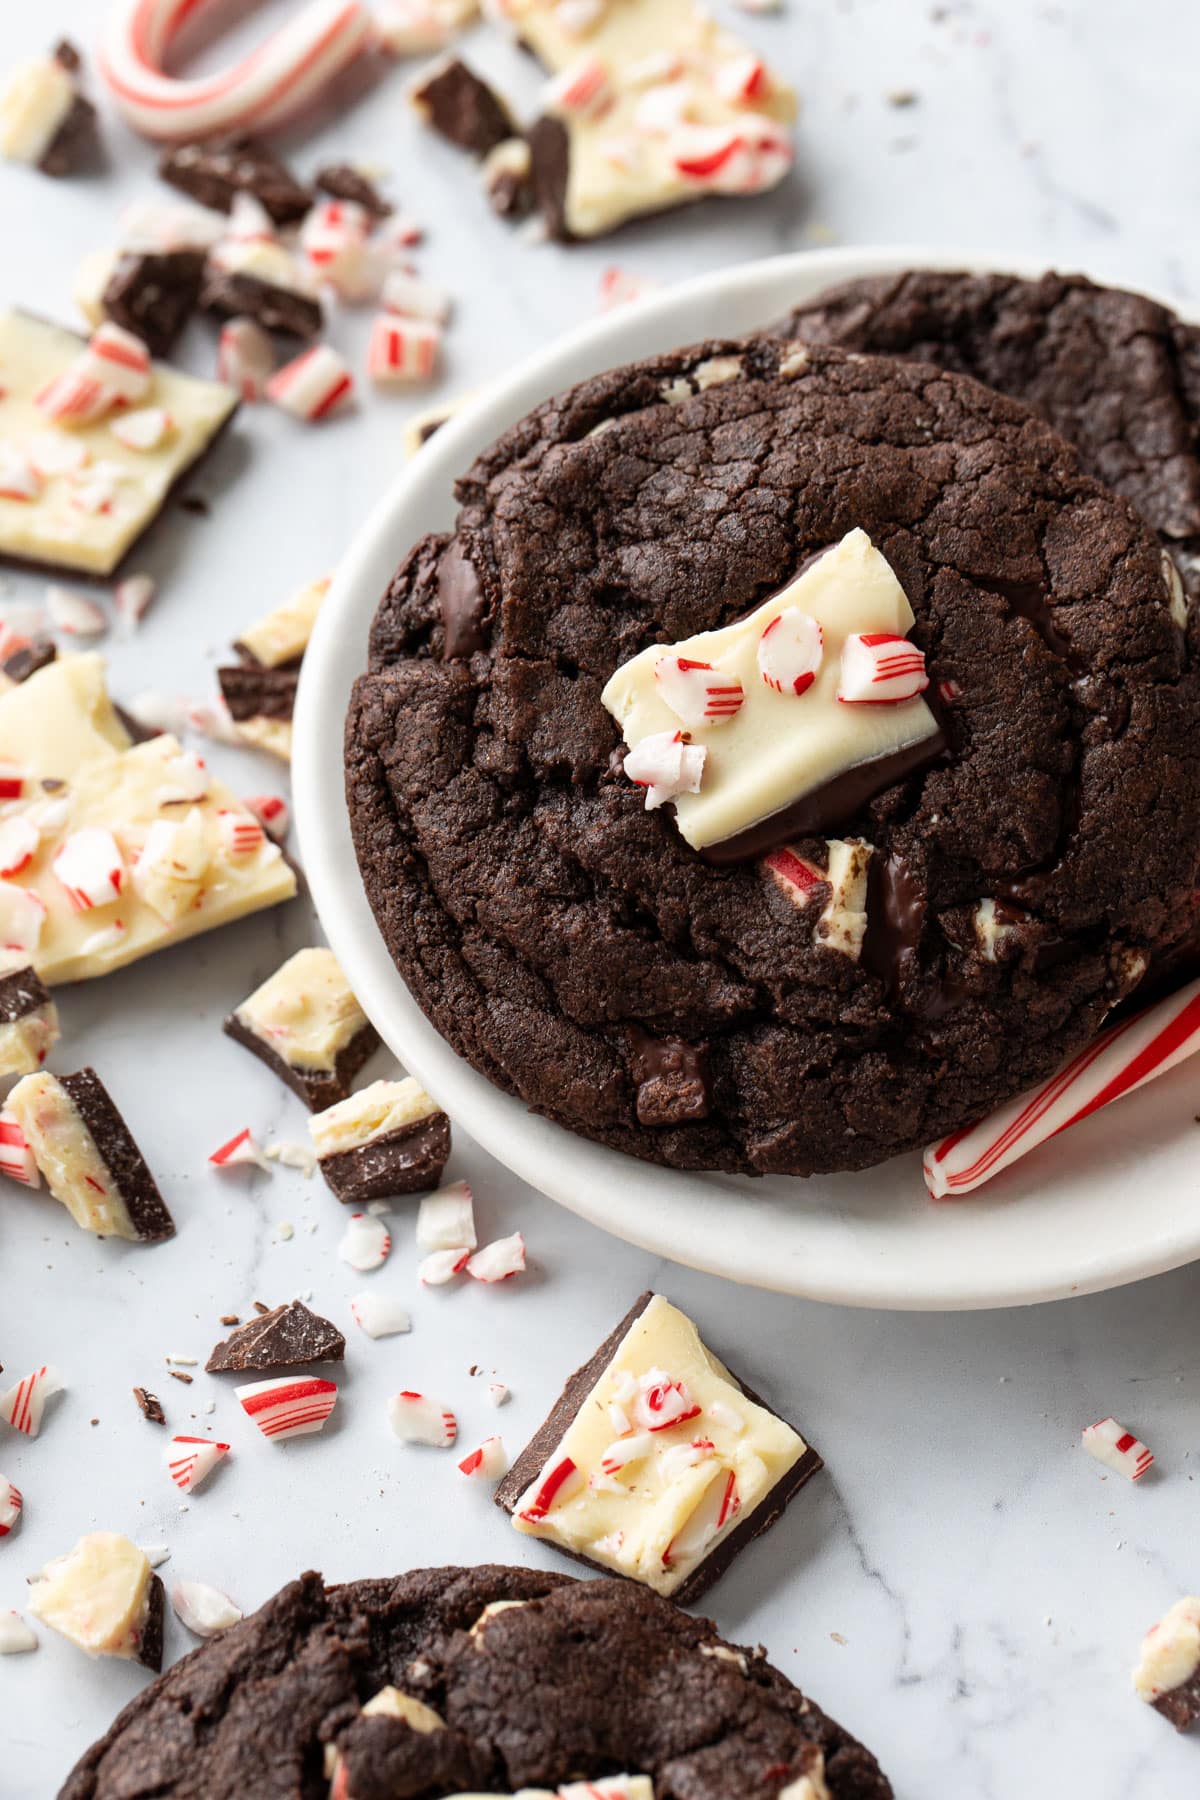
When you can’t decide if you want Christmas cookies or classic peppermint bark, these dark chocolate cookies let you enjoy both at once: studded with peppermint bark pieces and topped with squares of peppermint bark for a truly festive, truly glorious cookie that’ll easily become a new holiday favorite.
These cookies are a true holiday showstopper: deeply chocolate with bits of chopped peppermint bark instead of the usual chips, plus an extra square of peppermint bark nestled on top so you know exactly what you’re biting into. And because it is a melted butter-based cookie, you can mix it by hand, no electric mixer required (and no worrying about softening butter ahead of time, either!)
I love peppermint bark… but not necessarily on its own. But making peppermint bark-ified versions of other kinds desserts, well, that I’m totally on board for (see: peppermint bark shortbread and peppermint bark brownies). Peppermint and chocolate should always go together, in my opinion!
These deeply chocolate, peppermint-infused, rich and gooey cookies are the result of years of testing. And I deeply apologize for the extended wait, because you’ll soon find this is one cookie recipe you can’t live without.
What took me so long? Well, whenever peppermint season came around I’d make a batch or two, tweaking the recipe and making it better each time, but it still wasn’t quite right. And I didn’t much feel like testing peppermint cookies come January (I’m sure you understand!) So yes, I’ve actually spent 4 years perfecting this recipe, though I’ve only made it about 5 or 6 times over that period of time.
I am picky about my cookies. The flavor needs to be right, but so does the appearance AND the texture. My first couple attempts just weren’t chocolatey enough. Sure they tasted like chocolate cookies, but the chocolate just felt… flat? Despite the cookie itself being… puffy? And the texture was a little dry and chalky. Definitely not what you’re wanting in a deeply chocolate cookie.
Ultimately, to produce a well-rounded and complex chocolate flavor, I ended up incorporating a whole lot of cocoa power, using a mix of both Dutch process cocoa and black cocoa for added richness and a deeper color. I also added some espresso powder and whole milk powder to further prop up the chocolate flavor. And using actual peppermint bark pieces for a creamy, elegant peppermint flavor, as opposed to peppermint baking chips which often taste a little like, uh… Santa’s toothpaste if I’m being honest.
Maybe it’s the coalescence of creamy white chocolate and dark chocolate, the crunch of the real candy cane bits, or the fact that peppermint bark usually uses higher quality white chocolate instead of white candy coating, but once I switched to chopped up peppermint bark instead of the chips the difference was an immediate improvement.
While I tested versions of this cookie with melted chocolate in addition to the cocoa powder, the results were pretty similar in appearance and the melted chocolate surprisingly didn’t make much difference in the flavor. We opted for the cocoa-only version in the end, since I don’t think the inclusion of the melted chocolate made any noticeable difference, but feel free to melt 2 ounces of dark chocolate with the butter if you want an slightly more brownie-like cookie.
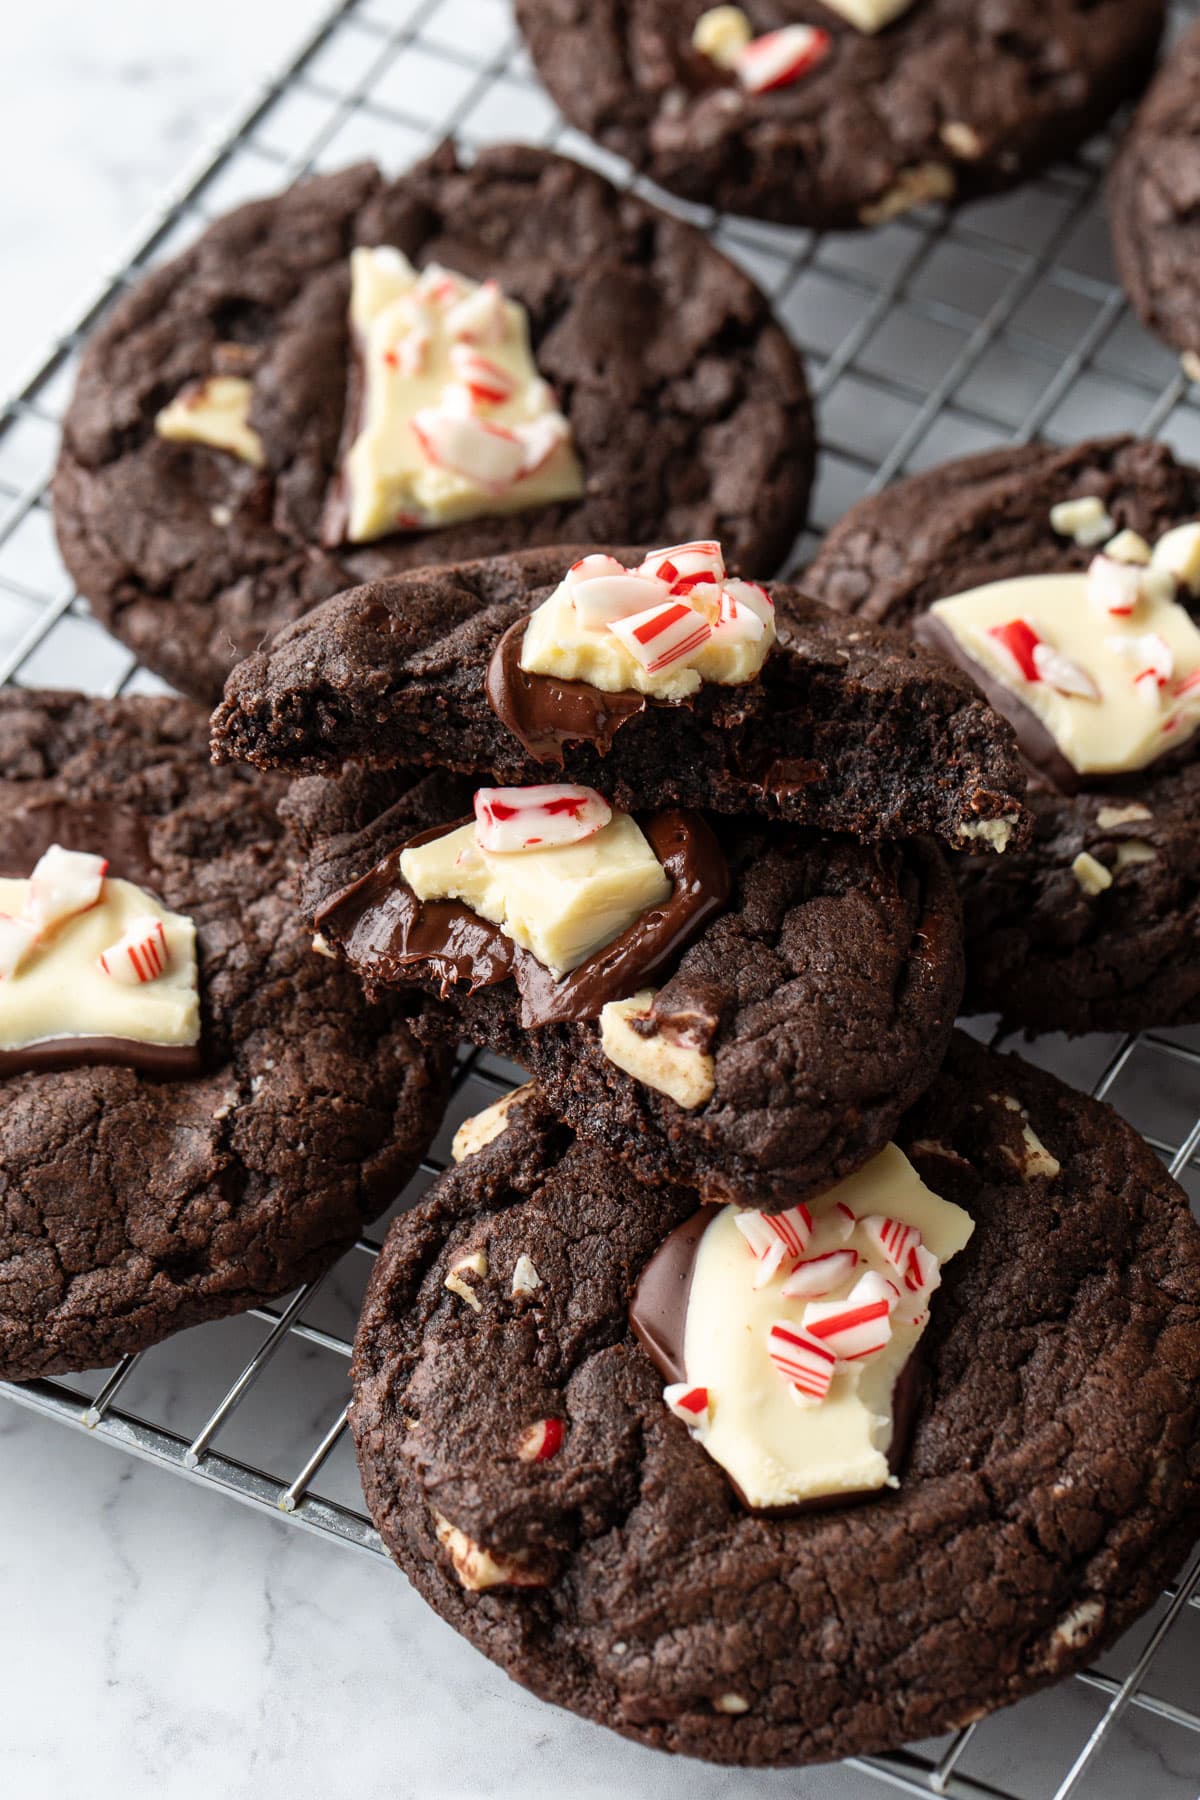
The final result is a deeply satisfying chocolate flavor with just the right amount of peppermint and a soft, fudgy texture; dare I say it’s nearly as satisfying as the fudgiest brownie? Definitely worth the wait.
Because the dough uses melted butter rather than creamed, it’s super easy to mix together by hand using just a bowl and spatula (you can certainly use an electric mixer if you like, but it’s definitely not a requirement like creamed butter recipes). I personally love melted butter cookies as the results tend to be chewier as there’s less air mixed in to the dough. I also find they usually spread more consistently and evenly (again, less air, and because the butter is already liquified it doesn’t go through as stark of a change when it hits the hot oven).
Another mark in its favor? These cookies can be baked up immediately, no chilling required! The impatient among us, myself included, love the sound of that! (Of course, if you find your cookies spreading more than you’d like, a quick chill of 10 or 15 minutes should tighten them right up!)
Ok, enough of the why. Here’s the how!
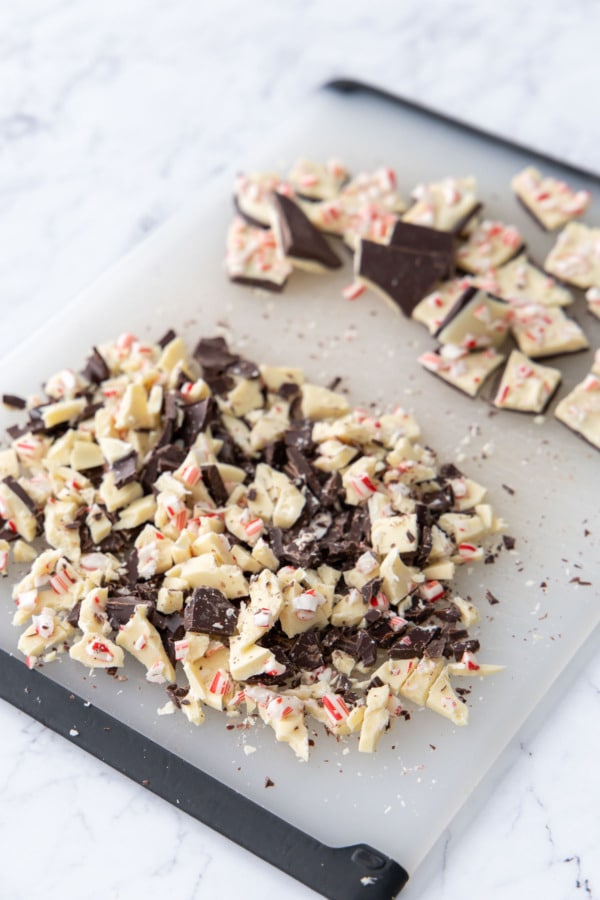
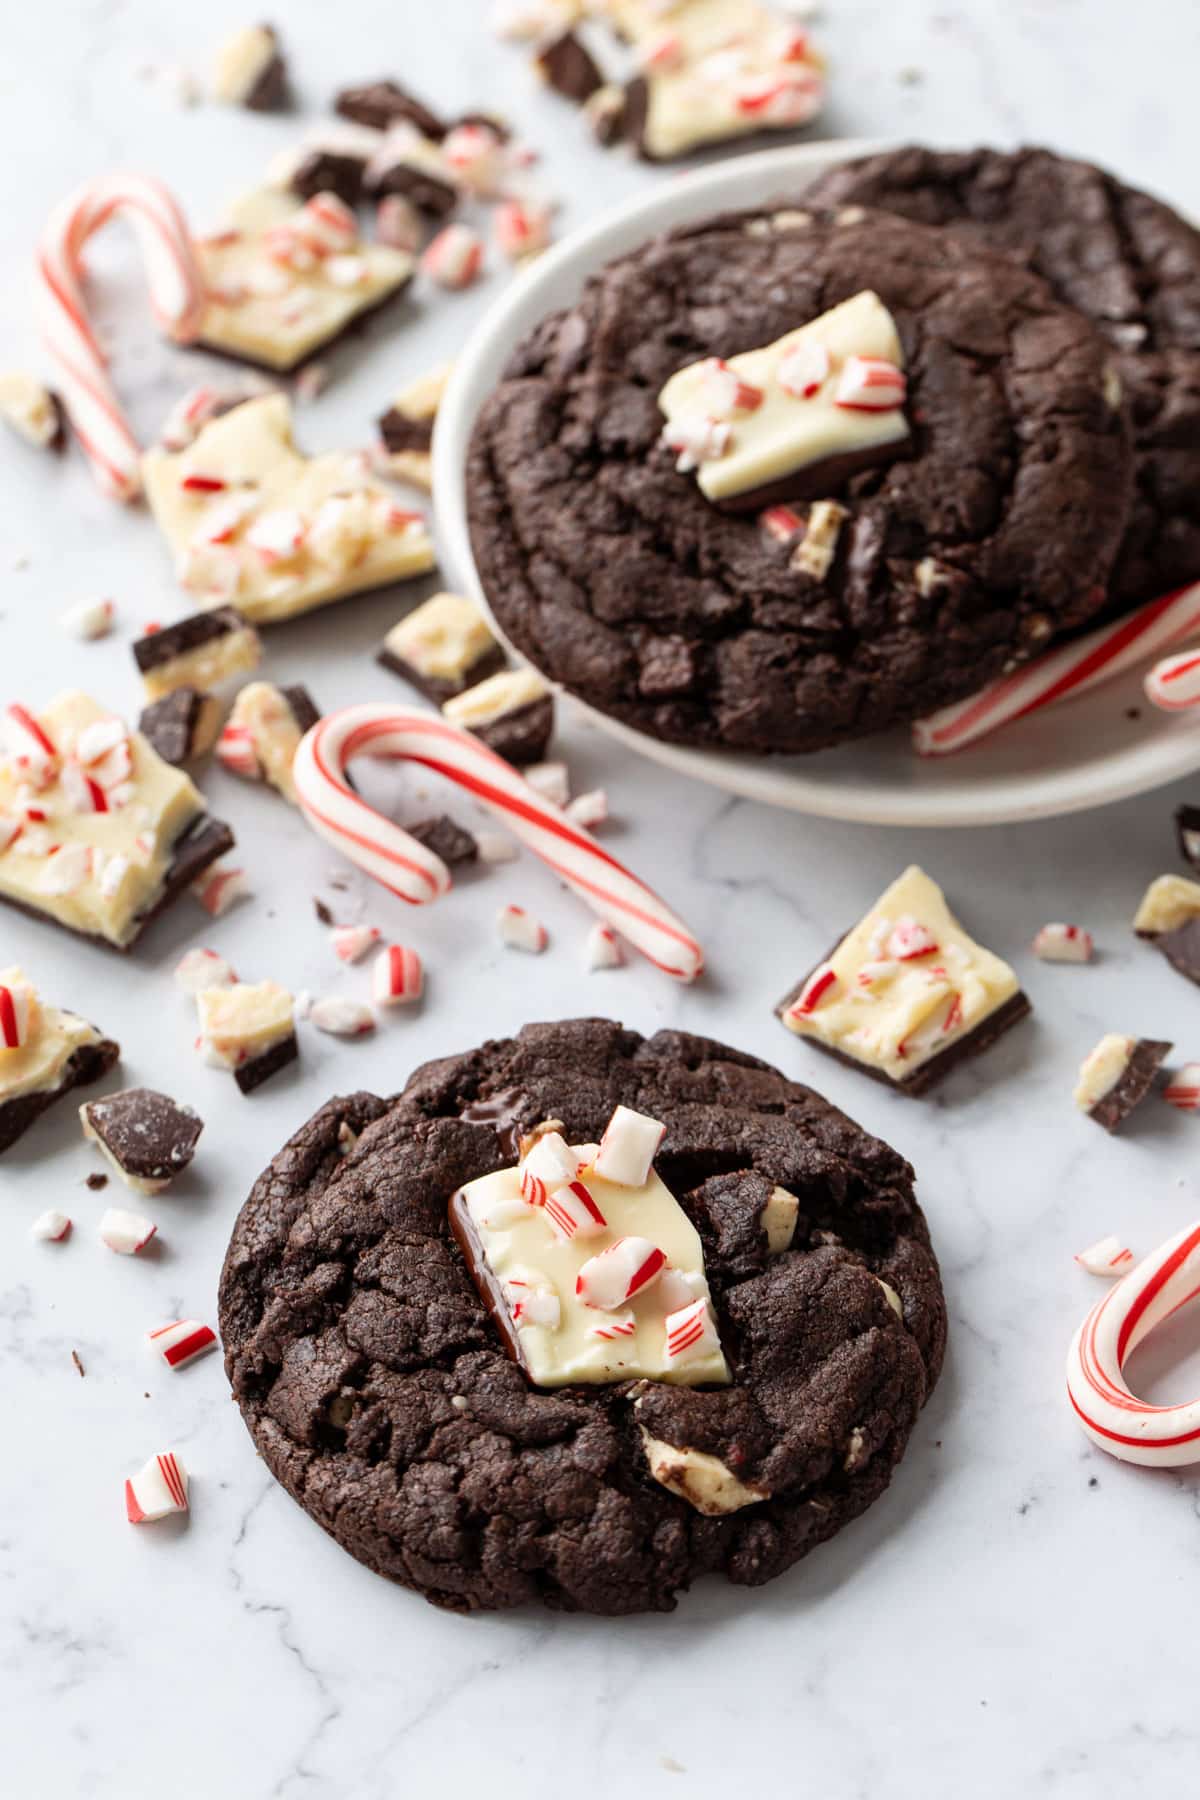
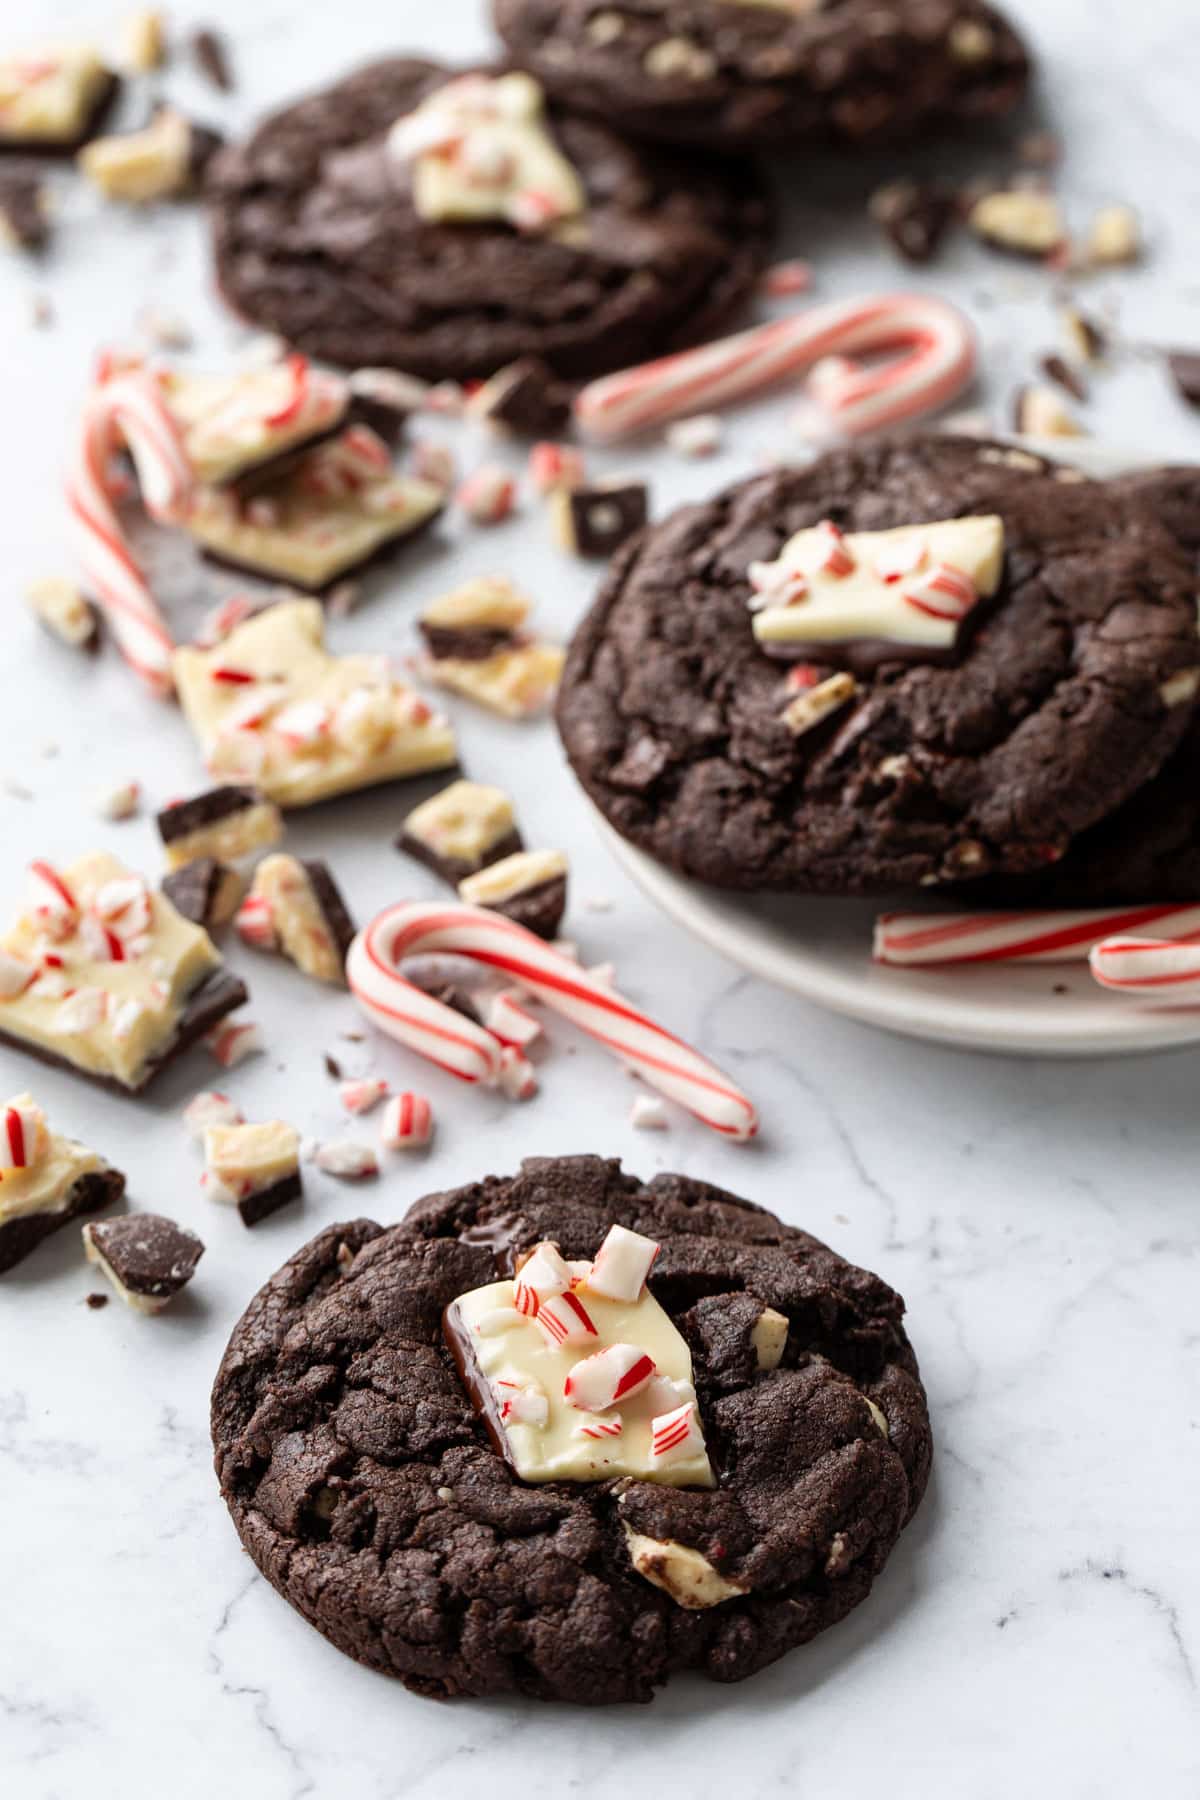
Peppermint bark can be purchased or homemade (recipe for my homemade version coming soon), though keep in mind you don’t want a super thick bark (I tried using Trader Joe’s first and it was so thick it was hard to chop by hand and looked really clunky sitting there on top the cookie). A bark that’s more like 1/4-3/8″ thick is the ideal.
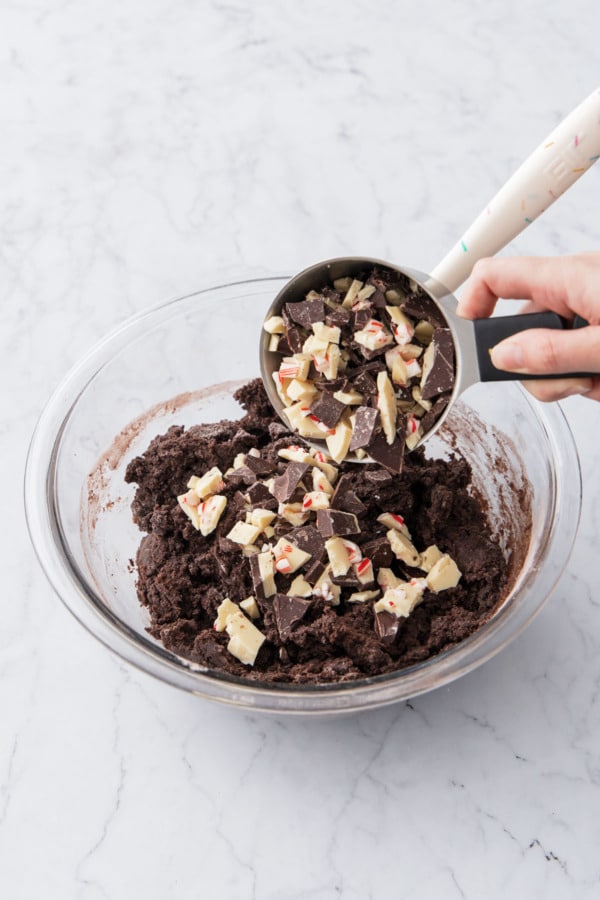
You’ll need a total of 300 grams or 10 ounces of peppermint bark for this recipe: about two thirds of it is chopped up into chip-sized pieces and folded into the cookie dough, while the rest is broken up into larger pieces and placed on top of the cookies immediately when they come out of the oven, softening and fusing to the top of the cookie while still retaining its general shape and pristine color.
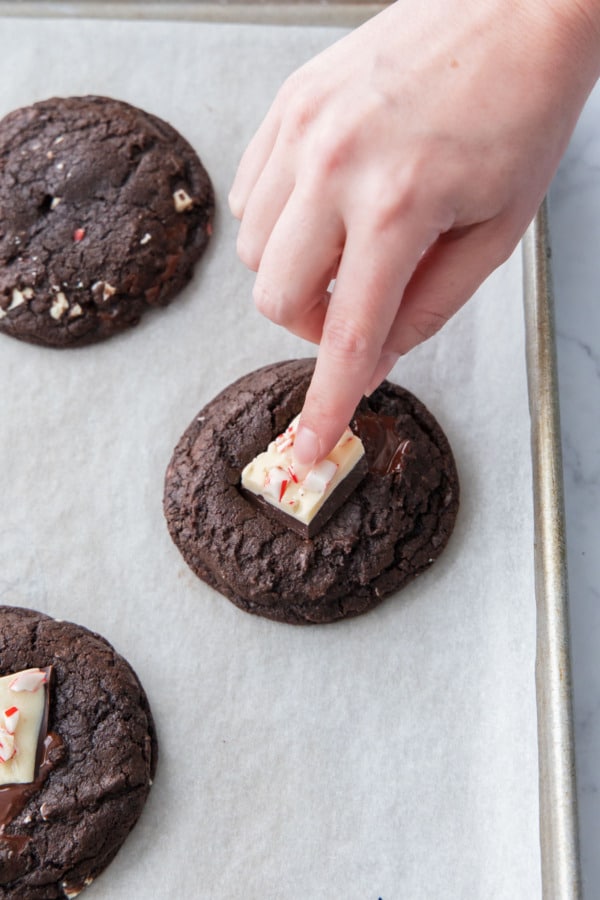
Why wait until the end to add the peppermint bark on top? If you add it beforehand, the white chocolate will get toasty and brown on top, which is tasty and all, it just doesn’t look as pretty. But by placing the bark on top of the hot cookies just out of the oven, the residual heat melts and softens the bark just enough to it sticks to the top of the cookie without any unappealing color changes.
Freeze!
The best Christmas cookies are the ones that can be made ahead of time. While these cookies keep pretty well in an airtight container for a couple of days, any longer than that and I definitely recommend freezing them.
While many folks opt to freeze unbaked dough to bake at a later time, my preference is for freezing the cookies after baking.
For soft and chewy drop cookies like these ones, freezing them after baking actually improves the texture (they somehow get even chewier when they come out of the freezer). Just give them a short stint at room temperature—or rewarm briefly in a toaster oven or air fryer—and enjoy! Or forget thawing and smush a scoop of peppermint ice cream in between two frozen cookies for an extra special, extra chilly treat!
To freeze these cookies or other baked drop cookies, once they are fully cooled and the peppermint bark piece has returned to a solid state, wrap cookies by twos or threes in plastic wrap, then place in a zip-top bag or airtight freezer container to prevent freezer burn as much as possible. They’ll keep in the freezer for up to 2 months!
If you prefer to freeze the unbaked dough balls you certainly can, just portion into balls (flatten them slightly into pucks before freezing), arrange on a parchment-lined baking sheet (no need to space them out), and freeze until solid. Once they’re good and frozen, transfer to an airtight container or zip-top bag and keep frozen for up to 2 months. You can bake right from frozen, though I recommend a slightly lower temperature and slightly longer bake time to ensure the cookies are baked evenly throughout.
Ingredient Notes & Substitutions
Peppermint bark: I used my own homemade peppermint bark for this, but you can use store bought as well (as long as it’s not super thick) or something like peppermint bark squares. You’ll need about 10oz/300 grams for this recipe (some gets chopped up like chips, the rest stays in larger pieces to be placed on top of the still-warm cookies).
You can also replace the mix-in portion with peppermint chips if you like, or a mix of peppermint chips and dark chocolate chips to replicate the white and dark portions of the peppermint bark.
Mix it up: you can replace the peppermint bark with any other flavor of chocolate bark (hello chocolate peanut butter cup bark) or even another slab-shaped candy like English toffee!
Peppermint extract: A bit of peppermint extract in the dough enhances the peppermint flavor even more (I found the bark/chips alone wasn’t quite enough). That said, you can leave this out if you like.
To use an oil-based peppermint flavoring (culinary grade only please), you’ll need much less, more like 1/16-1/8 teaspoon instead of 1/2 teaspoon. I use an oil-based flavoring in my peppermint bark (just a few drops!) to not seize up the chocolate, but either can be used in cookies. Just be careful as this stuff is powerful and too much could easily ruin the entire batch. I recommend starting with a couple drops and going from there.
Cocoa powder: I used a mix of dark Dutch process cocoa powder and black cocoa powder to get a very dark color and deep flavor (I used 1-2 tablespoons black cocoa and the rest Dutch process). You can use all Dutch process if you like, just don’t use all black cocoa powder (it doesn’t have as much fat as other cocoas and your cookies will be dry). I also do not recommend natural cocoa for this recipe as it will result in a much lighter cookie and a mediocre chocolate flavor.
Dry milk powder: Dry milk powder adds structure and richness to the cookies. Think of it like the foundation upon which the chocolate flavor sits. Without it, the chocolate falls a bit flat (but the cookies will still technically work). I used dry whole milk powder, but nonfat dry milk powder works too.
Espresso powder: Instant espresso powder is my secret ingredient to make chocolate taste even richer! It’s just half a teaspoon, so the cookies themselves have no noticeable coffee flavor. Be sure to use instant espresso powder, NOT espresso coffee grounds.
Chocolate Peppermint Bark Cookies
Dark chocolate cookies studded with peppermint bark pieces and topped with squares of peppermint bark for a truly festive, decadent cookie.
-
Preheat oven to 325 degrees F. Line a baking sheet with parchment paper and set aside.
-
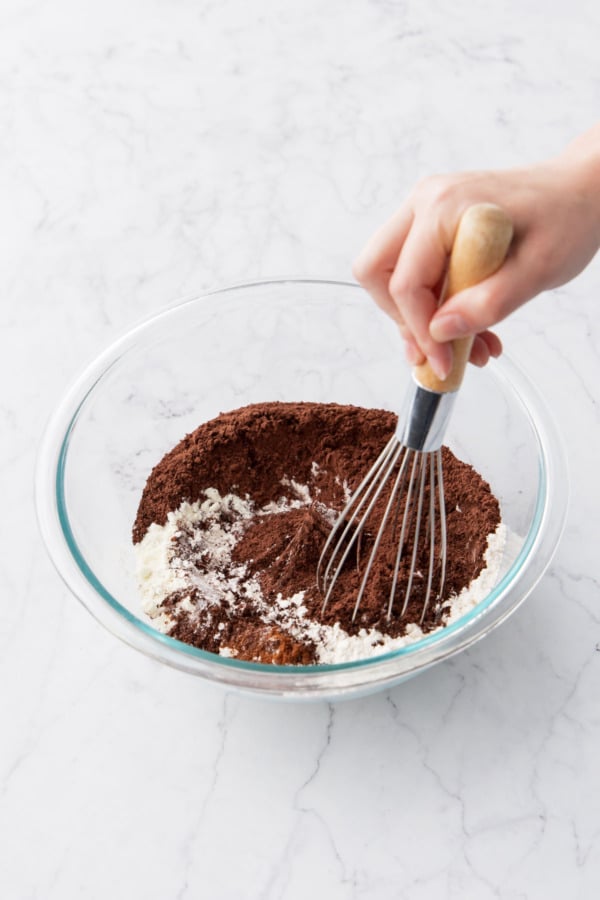
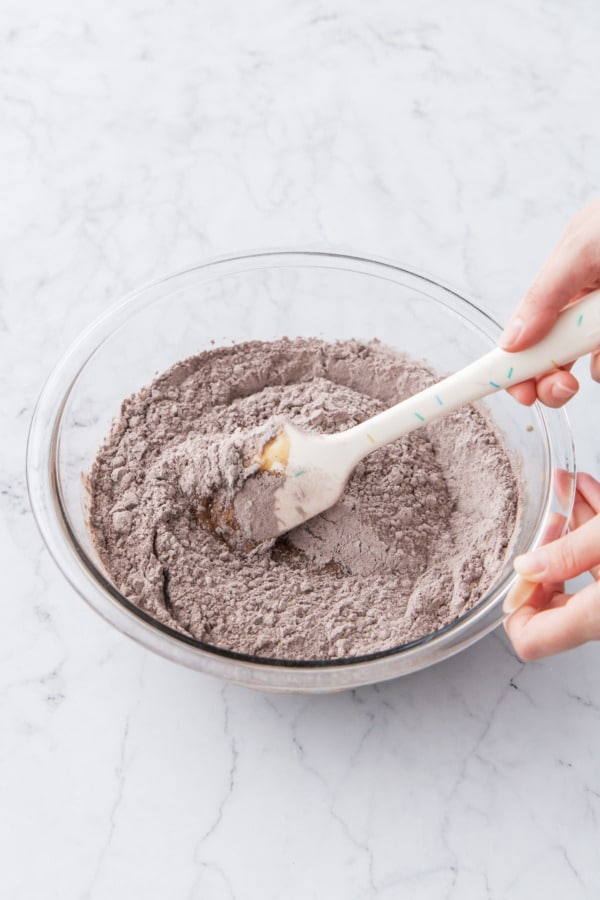
In a bowl, whisk together flour, sifted cocoa powder, baking soda, instant espresso powder, and salt. Set aside.
-
Melt butter in a small saucepan set over medium heat, or in the microwave in short intervals at 50% power. You want it just melted, not hot and sputtering.
-
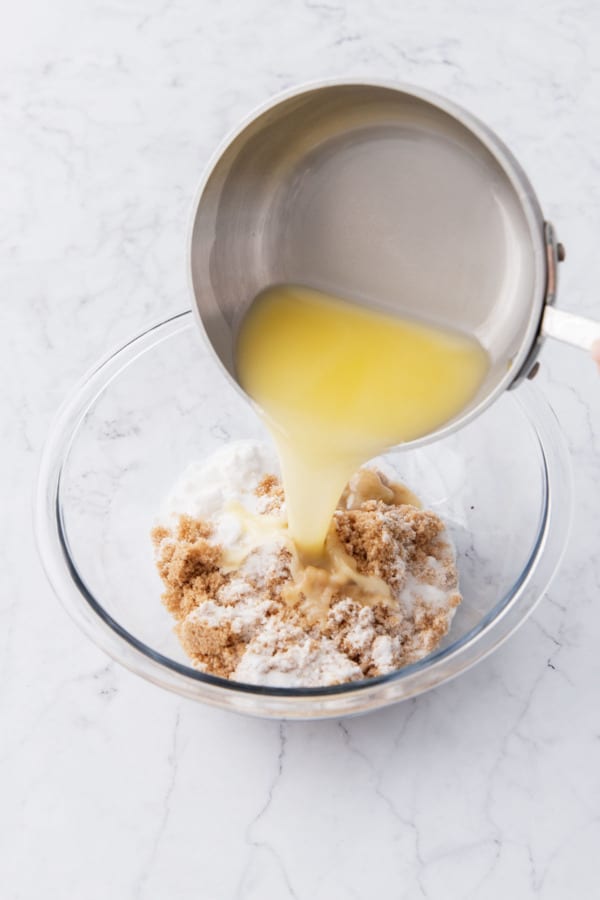
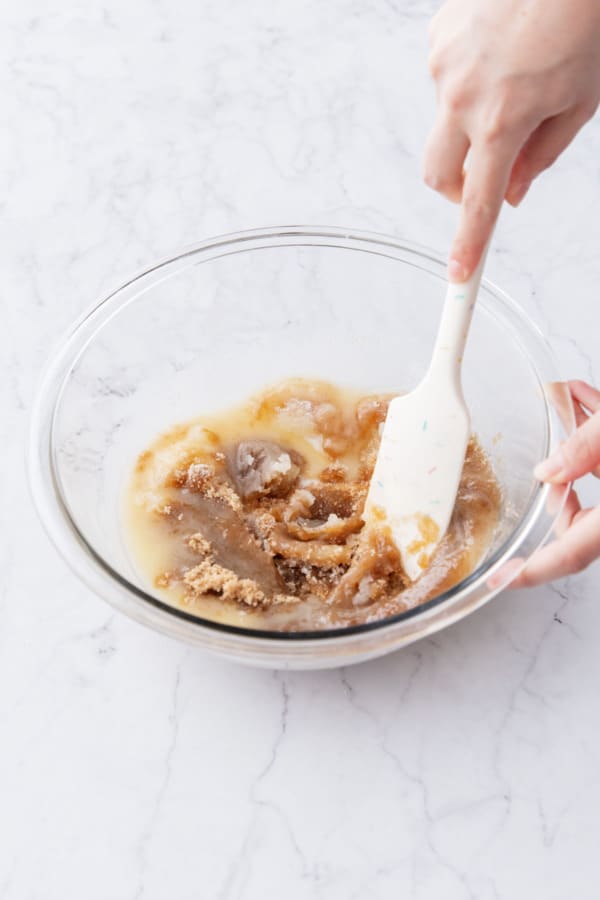
In a large mixing bowl, combine brown sugar and white sugar. Add melted butter and stir until smooth.
-
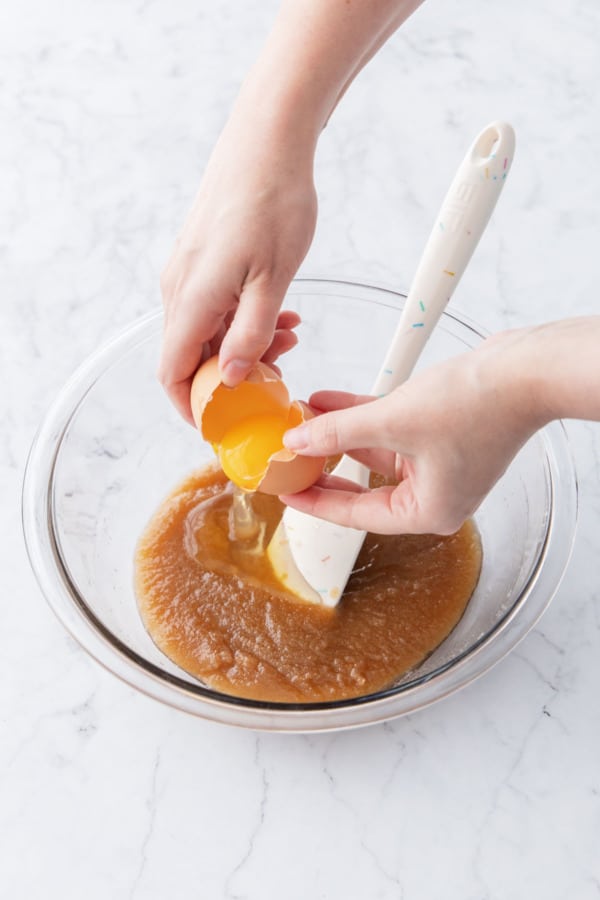
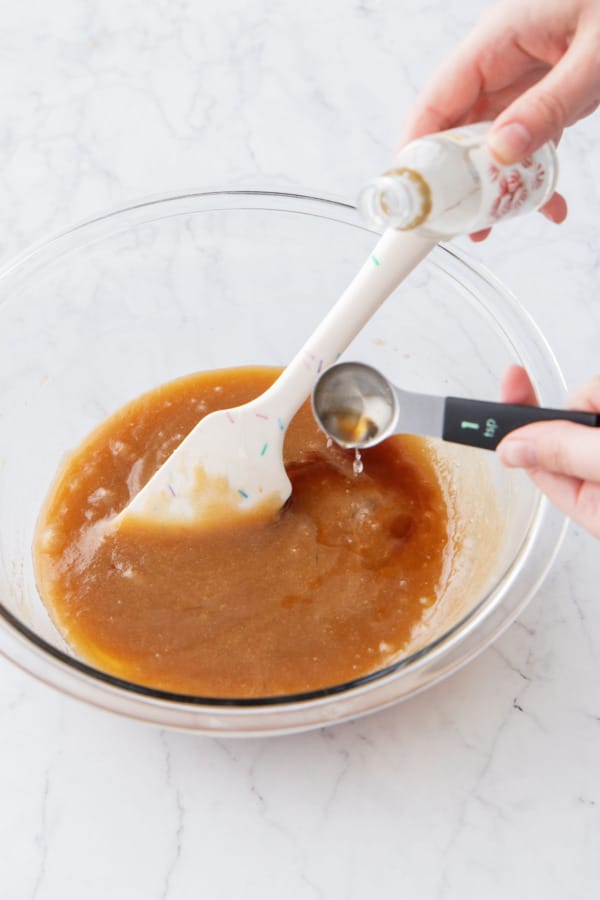
Add egg and mix with a whisk or spatula until smooth and emulsified, then mix in vanilla and peppermint extracts.
-
Add dry ingredients and gently mix with a large spatula until flour is almost nearly incorporated. Fold in chopped peppermint bark until evenly distributed.
-
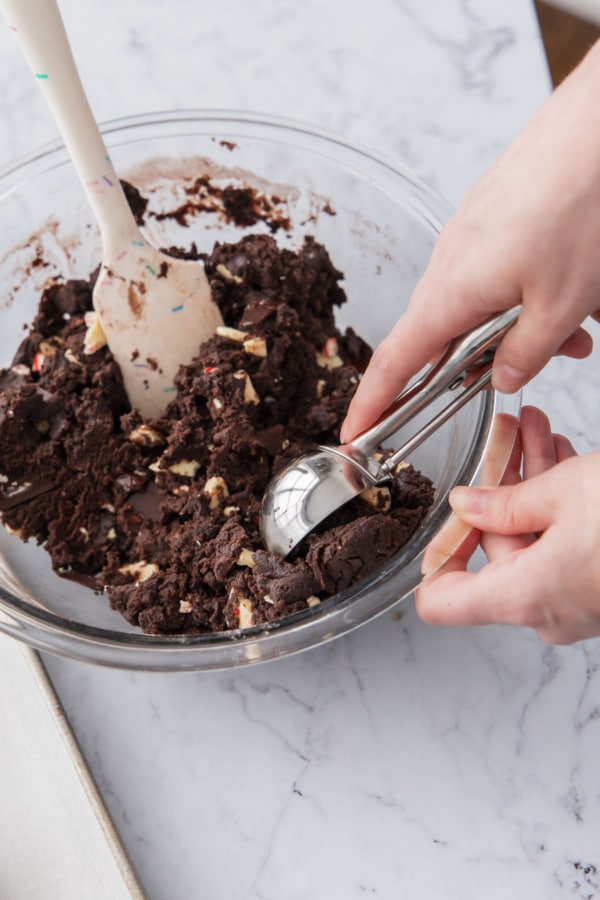
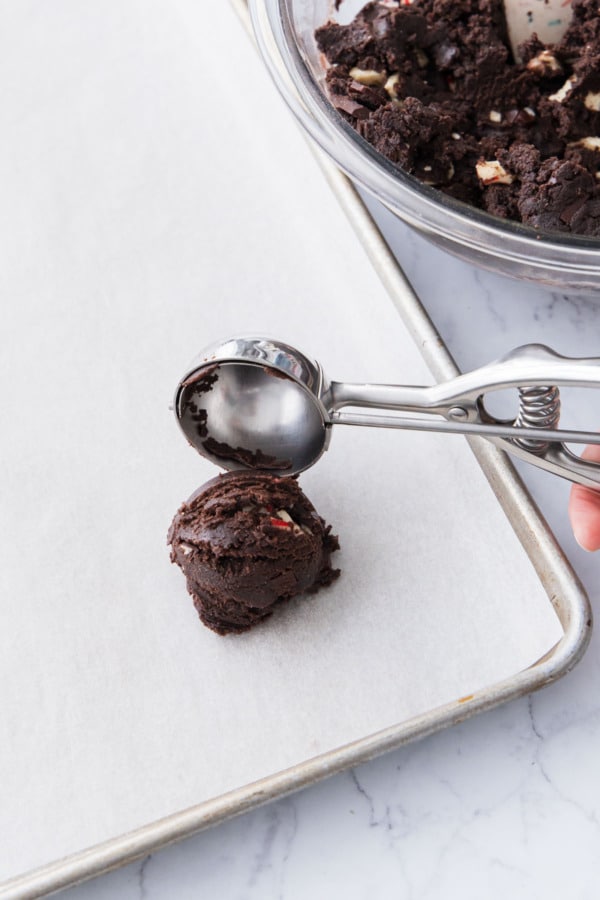
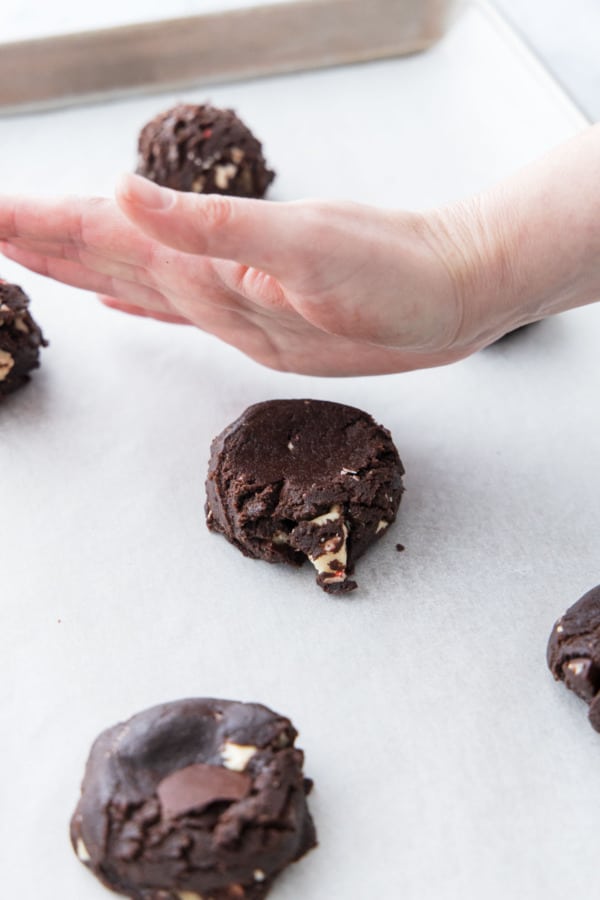
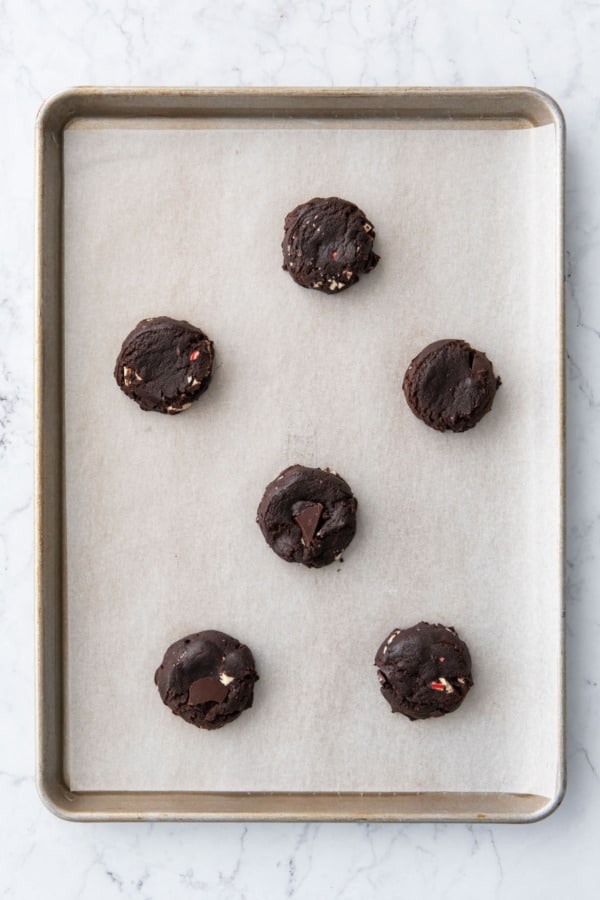
Use a large cookie scoop to form 2-inch balls (approximately 60-65g each). Place on prepared cookie sheet and flatten slightly with the ball of your hand to make a puck-like shape (this makes for a more even spread without a big ‘hump’ in the middle). Repeat, leaving 2 inches apart on baking sheet (you should be able to fit 6-8 max on one sheet).
-
Bake for 10 to 12 minutes or until cookies have spread evenly and tops are no longer raw looking (but they won’t be completely matte yet, you don’t want to over-bake these cookies).
-
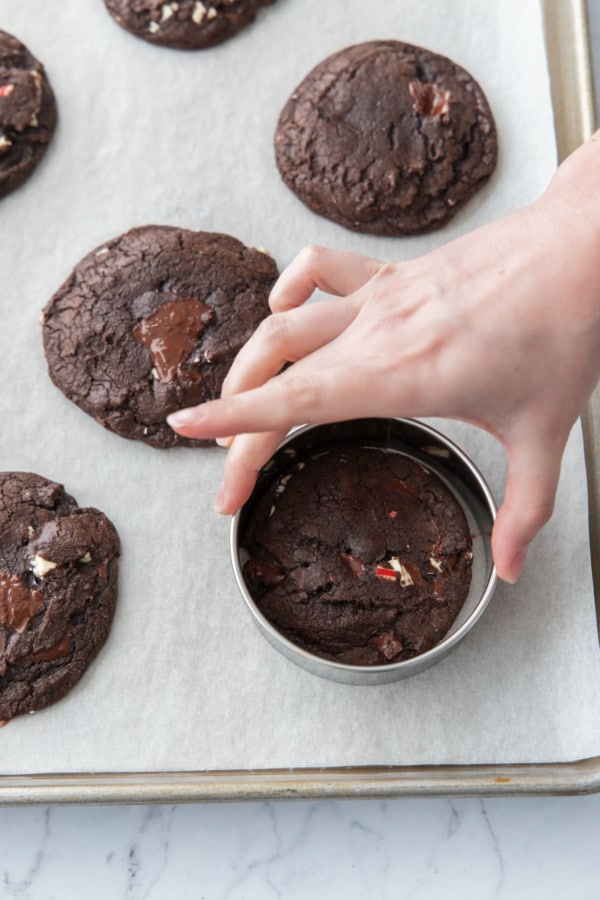
Immediately after removing from oven, optionally swirl a large round cookie cutter around the edges of the cookies to perfect the circular shape. Then, while the cookies are still hot, lightly press a square of peppermint bark into the top of each one. Let cool on cookie sheets for 10 additional minutes, then transfer to a wire rack to cool completely.
-
Cookies will keep in an airtight container for up to 5 days, or wrapped and bagged in the freezer for up to 2 months.
- * I used mostly Dutch process cocoa, with a few tablespoons of black cocoa for a deeper color and flavor (approximately 30g Dutch process and 15g black cocoa). Don’t use all black cocoa though or the cookies will be overly dry.
All images and text © for Love & Olive Oil.
There may be affiliate links in this post. We are a participant in the Amazon Services LLC Associates Program, an affiliate advertising program designed to provide a means for us to earn fees by linking to Amazon.com and affiliated sites.


